Garden trellises.
They’re the stuff of dreams, man.
Well, gardener dreams at least.
A few days ago I woke up with a plan. And like normal, I gathered the family into the living room and presented my case for that day’s spontaneous project, complete with sketches.
They weren’t impressed. At first.
But as soon as we got to work, they realized this was a really EASY and FUN project and it would solve a lot of problems for us in our garden space.
See? Mom knows what’s up.
The biggest culprit in our garden is the abundance of bermuda grass that infiltrates the north side each summer. We live in Arizona and we water our entire acre of land with irrigated water that comes out from the canal at the back of the property.
It’s a great, cheap resource for us here in the desert. But it also brings in a lot of weeds and makes our bermuda grow like, well, a weed. (Bermuda is actually a weed instead of a grass.)
I always hesitated putting a large raised garden box in this area because I just knew the influx of bermuda would take over each year and cause mayhem. Even black fabric isn’t enough to stop it.
I needed a growing area that would stay primarily off the ground.
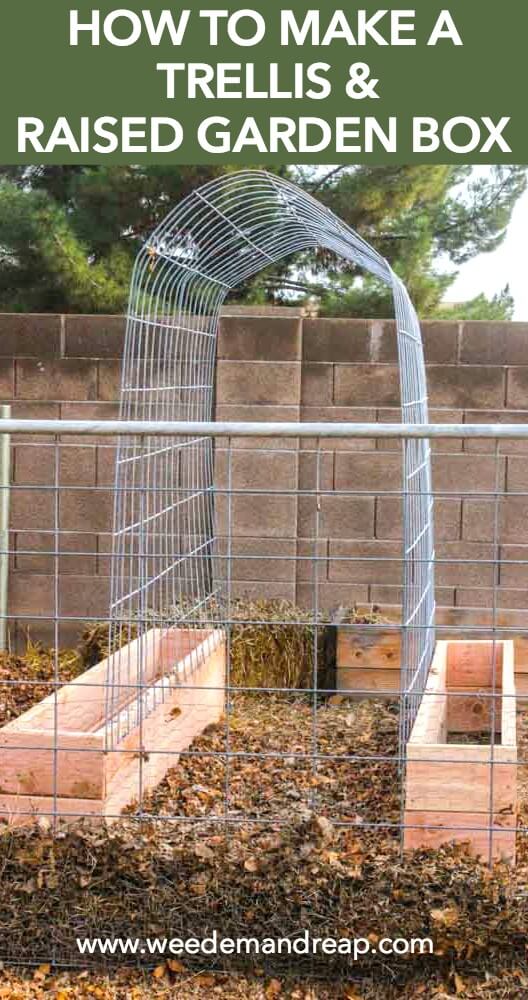
And this trellis & raised garden box combo is just the solution for us!
We only will have to water in the raised box area and as long as we don’t water too far down those boxes, it shouldn’t be a water source for the bermuda.
We also plan on packing a good foot of leaves and wood chips around the arch to keep the bermuda at bay.
Plus, it’s purdy. (Psst, that’s farm talk for pretty)
And for a gardener, that’s important!
Trellis & Raised Garden Box Combo
Step 1) Gather your supplies
The overall size of the structure is 57 inches wide x 8ft 2 inches long x 6ft 4 inches tall
The size of each box is 1 ft wide x 8 ft 2 inches long
- 9 (2inx8inx8ft) planks of wood. We like to use Douglas Fir wood for our raised garden boxes. You can read more about the best material recommended for raised garden boxes here.
- Star bit (where to buy) and accompanying deck wood screws (where to buy)
(We like using the star bit, it makes it a lot easier to drill) - 1/8th inch drill bit (where to buy)
The arch is 6 ft 4 inches tall and we the opening is 32 inches across
- 2 (4ftx16ft) cattle farm panels (where to buy) – we had them cut to 12 ft. long, but later on we realized we could have kept them the full length and attached them to the bottom of the boxes instead of at the top.
To attach the arch trellis to the raised garden boxes
Step 2) Cut and drill pilot holes in the short end of the boxes.
Since the boxes are double-deep, this means you’ll be making FOUR boxes, TWO on each side.
Take one (2inx8inx8ft) plank of wood, and cut it into 1 ft. sections. This will give you all the short ends you need for each of the boxes.
Next, mark the holes and drill pilot holes with the 1/8th inch drill bit into the ends of each 1 ft. section.
(TIP: This is a great job for kids!)
Step 3) Put together your raised garden boxes
Using the star bit and wood deck screws, go ahead and screw your boxes together!
You’ll be making FOUR boxes total, TWO on each side.
Step 4) Stack the boxes and attach them to each other
Stack one box on top of another and attach. Do the same to the other side.
The easiest way to do this is to drill a screw at an angle hitting each box.
Step 5) Bend the cattle panels into an arched trellis.
We found the best way to bend these 4 gauge cattle panels is to grab a log or a piece of wood and hold that down as you bend it over.
Step 6) Now it’s time to attach the trellis to the raised garden boxes
We used u-nails and a hammer and tacked the trellis easily to the raised garden boxes.
NOTE: We placed the trellis about 4 inches below the top of the boxes because we had our cattle panels cut to 12 feet long. If you left them at 16 feet, you can attach them at the bottom of the boxes.


Whew! Not too bad, right?
Okay family, you can take a break now.
That is, until my next project…


I was just wondering how you bent the cattle panel? I live in Minnesota, and the cattle panels I am thinking of are very heavy-duty and not meant to be bent. Are there different gauges of panels? I am building a new u-shaped 16′ x 16′ x 16′ by 4′ wide raised bed and this is the best idea I’ve seen thus far for a trellis. Thank you!
Hi Amy-
Yes, there are different gauges. The gauge DaNelle used is 4. You can click the link in the article to see exactly what she used.
The 4 gauge is a good balance of strength and flexibility. It will be sturdy enough to make a good trellis, but can also be bent with a little effort to the the U shape.
Thank you -Bobbi (DaNelle’s Assistant)
I can’t get the numbers to work out in my head. If you are starting out with and 8 ft plank and cutting it down to 4 foot sections…won’t the overall size be 4 feet long and not 8 feet? What am I missing?
Hi Liz-
I’m not sure exactly what you are referring to. In the instructions you do not cut the 8ft boards, except one of them. You cut it into 1ft sections for the end pieces, but the others are not cut.
Thank you -Bobbi (DaNelle’s Assistant)
Thank you. I totally misread the supply,list. I get it now!
Great idea! Just wondering, are the cattle panels “safe” to grow food on? I know there’s a lot of hesitation among organic gardeners in growing edible plants along side metals that could potentially leave toxins in the foods…
Hi Lindsay-
Steel cattle panels can be coated in zinc, which may under the right conditions (salt water corrosion or water immersion), leach out. However, zinc poisoning usually is not an issue with ingestion, like it is with inhalation. I personally wouldn’t be concerned, however, if it makes you uncomfortable to use the cattle panels please do not use them.
This article goes more in depth on zinc and corrosion and may be useful to you: https://galvanizeit.org/hot-dip-galvanizing/how-long-does-hdg-last/in-contact-with-other-metals
I hope that helps.
Thank you -Bobbi (DaNelle’s Assistant)
these are so great thanks for the idea I was wondering what different I could do for all my trailing veggies and melons cucumbers ect cattle panels are great that’s what I made my greenhouse from so will have to come up with alternative for arches on these raised beds possibilities are endless great job
Is it sturdy enough to support carving pumpkins?
Hi Wendy-
Yep, should work for pumpkins just fine. Thanks -Bobbi (DaNelle’s Assistant)
Hi Danielle
Love your post on arched trellis. Planning to build more than one parallel to each other, how much space do I give each trellis?
Hi Adekunle-
That’s great you are building some trellises! DaNelle says a good rule of thumb to follow is to allow 3 feet walking space in between each trellis. Hope that helps! Thanks for reading and Happy Gardening! -Bobbi (DaNelle’s Assistant)
Just an FYI, if you go to the store and ask for “U-nails”, be prepared for some very strange looks from the person at the store. Ask for fence staples instead. Great DIY by the way.
Haha, thanks for the heads up!
I’d like to see photos of how this trellis worked with stuff growing on it. Do you have any posted somewhere? Thanks
Check out my Instagram https://www.instagram.com/weedemandreap/
If u live in Louisiana, this would b a perfect trellis for merlitons!!! If u dont live in Louisiana, dont even ask lol. Ive seen them “imported” to a grocery in Texas & i think they were called alligator pears. I happened to live in Texas for awhile and the grocery couldnt find them under merlitons, i didnt know they were called alligator pears elsewhere so they would give them to me for free
Can you do the same with strawberry plants??? Love the idea of keeping veggies & fruit off the ground!!!!! Just moved to rural Pa. In the Poconos and love the openness of everywhere, I’m gonna try my hand at gardening so as to keep the grocery bill down for the spring and summer!!!! My three children love their fruit & veggies and I always spend an arm & a leg every year!!!!
That’s a good question! I’m not sure how this trellis would work for strawberries, but I have seen people do strawberries on trellises before!
Love love love this we did this and our peas look amazing saving so much of my other garden space thank you!!!
YAY!!
My mom had this idea of taking a round corn crib, and cutting it in half vertically to create arches on which to grow vining plants.
https://www.bristolwood.net/wp-content/uploads/2009/11/another-corn-crib.small_.jpg
This is a great project! I especially love how your family was involved. I am planning a similar setup using 4feetX8feet beds. I’m going to connect them end to end with a cattle panel arch. I’m curious as to how strong the trellis is. Will is sway in the wind. I’m also in Arizona and in rural Buckeye we get some terrible wind storms!
Hi Teresa! I love a good fellow Arizonan!
When the boxes are filled with soil, they are incredibly heavy, I’d say 150-200 lbs., so no swaying in the wind here.
Instead of using a log to bend the panels how about using an empty 55 gallon barrel?
And what about using a wicking bed garden – this is where you line the box, say to the lower level, with plastic, this becomes the trough for watering, the rest of of the box is filled with more soil. Look up wicking beds on the net for a better explanation. I would think that this might overcome the weeds bought in by water and you only need to water (fill the plastic reservoir) say weekly.
I love this idea! Living in an urban home we don’t have much of a yard, but we do have a roof deck. I’m thinking this might solve some space issues for us, but I’m worried that it might not be heavy enough not to take flight in the strong winds we get in Seattle. Do you think that with both beds filed with soil this is heavy enough to withstand strong winds? I fear that the archway might act like an umbrella and give the wind something to catch onto and lift the structure a bit or else knock it over.
Hi Ame,
Yes, it’s SUPER heavy now with all the soil, I don’t think I could move just one side even if I sat on the ground and pushed with my feet!
Love the instructional!! I am going to build one of these! Do you know how much soil and what mixture you used for them?
Hi Jessica!
Here’s the combo we used! https://www.weedemandreap.com/best-soil-combination-raised-garden-boxes/
We have the trellises in our garden too. It is just beautiful. Great job! Make sure you share pics with those veggies growing.
The grandkids loved running thru the garden. We even had someone ask to get married under one of the arches it was so cute.
What do you plan to plant for the trellis?
Hi Wava,
I just planted snap peas and they’re doing great so far!
Great design! My 6 yr old grand daughter will love hiding under the trellis. My hubby posted this to me on facebook and now he will have to build me a few! LOL Thanks!
Thank you for this tutorial. I try to add something new to my garden each year, and I have found it in this.
Hi I was wondering if I could use this for grapes? I am new to grapes and wondered if it was sturdy enough?
Grape trunks can get rather large, so I’m not sure they would go great in the box, but they sure love trellises!
I’m curious why you had to make the trellis bend? Why not just have two straight trellises, one on each box? You don’t need the “height” of such a structure and if each box and straight trellis were separate, you could move them around easier…..just wondering….
Hi Elle,
Oh, just for fun:) I wanted to have something I could walk under and take fun pictures:)
Thanks for this tutorial. We walked through a cave of gourds in our local pumpkin patch this past October, and wasn’t sure the logistics of it. I need to grow up to keep our free-range chickens from devouring our food, and am trying everything I can! Love your blog, btw, being a former goat owner myself.
Thank you. I had this idea months ago and didn’t know how to explain it to my husband. He now gets it and will make it come spring!
Great instructional post! So professional!
Just noticed you forgot to add a link in step 1 where it says:
You can read more about the best material recommended for raised garden recommended for raised garden boxes here.
You write wonderful posts, and I love your blog!
Thanks so much for the heads up, I fixed it!
So what do you plan to grow in the boxes?
Hi Valerie,
I’m going to grow all sorts of vine veggies and fruits like cucumbers, snap peas, cantaloupe, squash, watermelon and even tomatoes:)
Runner beans are great, too. Both edible and beautiful . . .
Will the heavier fruits break off the vines if they are suspended? I’ve thought about doing that myself but was concerned with the heavier weights.
Hi Amy-
Surprisingly so, the trellis methods works great even for large and heavy fruits like watermelon. However, you can give our heavier fruits a little support by making them a sling if you feel they need the extra support. This article talks more about watermelons, trellises, and slings. https://www.gardeningknowhow.com/edible/fruits/watermelon/watermelon-vine-support.htm#:~:text=Quite%20an%20array%20of%20veggies,surprising%20is%20watermelon%20trellis%20growing.&text=Growing%20watermelon%20on%20a%20trellis%20saves%20floor%20space%20and%20efficiently,closer%20to%20the%20light%20source.
The Gardening Know How site is a great overall resource for gardening: https://www.gardeningknowhow.com/
Best of luck with your garden!
Thank you -Bobbi (DaNelle’s Assistant)