Natural Yeast. Wild Yeast. Sourdough. Wild Sourdough.
Why should you even bother with natural yeast?
What exactly is growin’ in that jar of yours?
Before we get into the “how-to’s” of reducing that tangy flavor, let’s go over the basics of bread making.
- You make your dough by adding flour, water, 1-3 cups of natural yeast, salt & any extra goodies like honey, molasses, oil, herbs, spices.
- Your little yeasty friends get to work and within 3-8 hours (depending on the recipe) your bread has doubled in size. This is called the rising period. If you had used commercial isolated yeast culture (also known as Brewer’s yeast) it would have risen in a shorter amount of time, more like 30 min.-1 hour. But we don’t want to deal with that silliness, now do we? No ma’am! We want our bread to slowly rise, giving it the time it needs to break down all that badness (gluten & phytic acid) and open up all the goodness (vitamins, minerals & nutrients).
- You punch down that risen dough of yours and shape it into loaves. Or buttery rolls. Or cinnamon rolls. Or doughnuts. Or pizza. (Hint: This is where it starts to get good).
- You let it rise again (anywhere from 10 minutes to 2 hours) depending on what you’re making and how big you want it to go, and then BAKE that mutha’! Voila! The end!
The key to keeping your natural yeast starter alive is to understand how yeast works.
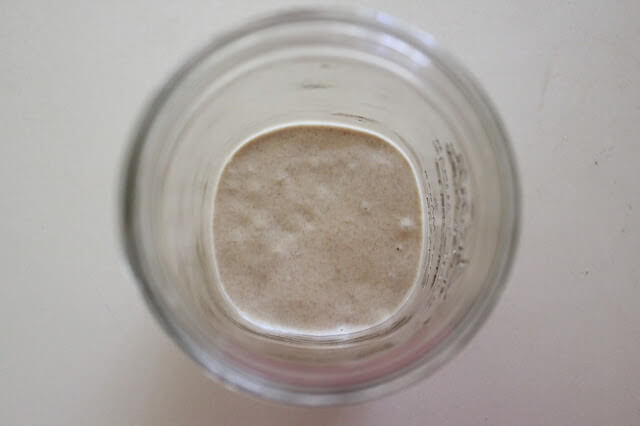 |
| Here’s my yeast. It needs to be fed. I had it in a previous jar that had about 4 cups of natural yeast in it. But I wanted to reduce it before I fed it. You can do that too if you don’t want tons of yeast. |
 |
| To feed my natural yeast starter, I simply add equal parts water & flour to whatever I have. Here I had 1 cup of yeast starter. So I added 1 cup of water and 1 cup of flour. |
 |
| I mixed it all together and was finished. Consider yourself fed my yeasty companions. |
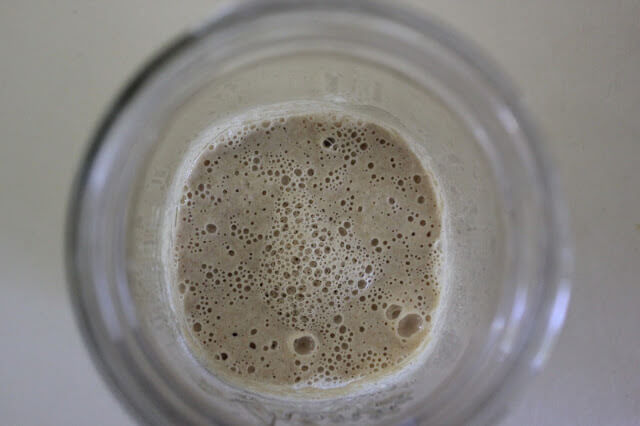 |
| Why hello there carbon dioxide! I left my yeast on the counter in my kitchen. At room temperature, this yeast had brought itself to “readiness” in about 6 hours. If I had left it in the fridge, it would have taken a couple days to get “ready for baking”. |
- I start with whatever I have, or I simply reduce it to what I need. You can reduce to as little as 1/4 cup of natural yeast if you want.
- I feed it. You add equal parts or water & flour. If you have 1/4 cup of yeast, you add 1/4 c. of water & 1/4 c. of flour.
- I let it do it’s thang. You have the option to let it sit on the counter or in the fridge. But there’s a little catch if you store in the fridge. While it spaces out your feedings, the lower temperature slows the growth of yeast, but DOESN’T slow the growth of bacteria. This means you will have very sour bread UNLESS you take it out, grow it on your counter for a day and “power” feed it 3 times to dilute the bacteria.
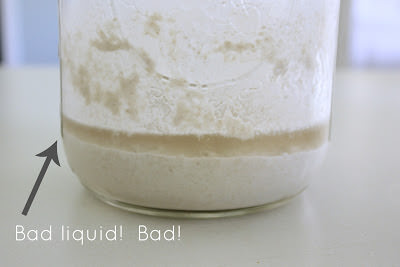
- I watch for the bubbles. Bubbles are a good thing. Liquid is not. A layer of liquid means your yeast is starving and the bacteria is taking over. Don’t worry, you can still bring it back to it’s former glory. Just pour off that liquid and feed a couple cycles before using.

Bobbi,
I left a comment on the other page (How to make a wild yeast start) that you don’t need to respond to, as this page answered my question. But now I have other questions.
In the How to Make page, it says to feed it 1/4 cup each day. I realize this is for MAKING the starter. And then this page, to feed it and keep it alive, says to feed it equal portions: what ever amount of yeast you have, you add that much flour and water. Is that rule (equal portions) always the case, or can I feed and keep alive with smaller portions? If I have 1 cup of yeast, can I keep feeding it with 1/4 cup of water and flour (each)?
Another question: If I have 1 cup of yeast, and I add 1 cup flour and 1 cup water, how long do I have to wait before I can use it?
And–if I’m not ready to use my yeast, but I don’t want to fridge/sour it, and I have 3 cups of yeast, would I add 3 cups of flour and 3 cups of water? (meaning, is that the right way to end up with a large batch of yeast?)
I’m sure as I start using my yeast, I’ll figure things out, but right now my head is swirling with questions!
Hello-
Feed it equal portions. So, if you have a cup of yeast, feed it a cup of flour and a cup of water.
Wait at a minimum of 12 hours to use your starter after feeding it, but 24 hours is better.
Thanks -Bobbi (DaNelle’s Assistant)
DaNelle:
I am on day 8 of your “How to make a wild yeast starter” instructions. My starter is doing great. There are bubbles throughout and it doubles in 6 to 7 hours after feeding. My question concerns moving the starter inside to the refrigerator on day 10. Based on everything I read above, this will slow down the yeast development and increase the bacteria. In addition, it appears that for the dough to rise, you have to take the starter out and get it to warm up. If that is the case, what are we trying to accomplish with the 7 days inside the fridge?
Scott C.
Hi Scott-
It allows you to slow the feedings. You don’t have to do this if you do not want to.
Thanks! -Bobbi (DaNelle’s Assistant)
I found your info on the refrigerator being a cause of sourness. I make yummy muffins, pancakes and the like but every time I try bread it goes sour and hard as a brick. Any advice?
Hi Nancy-
If your bread has a sour taste that may be a result of adding too much yeast. Bread usually turns out hard if it has been over-kneaded or baked too long.
Thank you -Bobbi (DaNelle’s Assistant)
I followed your steps for making my wild yeast starter and made my first loaf of bread but couldn’t get it to rise very much. Not surprising – my loaf turned out flat and very dense (but my chickens enjoyed it!). My starter had bubbles, but I can’t say it ever doubled in size during its creation. Any tips for improving its strength?
Hi Laurie-
Usually when your starter doesn’t perform as expected it’s a combination of things that are affecting it. Some of the things that can throw off your starter are temperature, the flour and water used (both quantity and quality), and frequency of feeding.
Here are some quick tips about each one that may help your starter:
Temperature needs to be kept at a cozy 75-85 degrees
Use the same flour to feed you starter as what you started it with
Every flour performs differently. So, you can make different starters using different flours until you find one you like
Make sure your flour is chemical free
Water should be filtered
Be sure to feed your starter frequently enough. If it’s developing hooch (liquid on top), that’s a sign it’s starving.
Make sure you are accurately feeding your starter. Be sure the ratio is the 1:1:1. For better reliability do the 1:1:1 ratio by weight
I hope that helps! Best of luck and Happy Baking!
Thank you -Bobbi (DaNelle’s Assistant)
Can I use the sourdough starter for baking whole wheat bread
Hi Cathy-
Yep, you can use the sourdough starter for baking whole wheat bread. Thank you -Bobbi (DaNelle’s Assistant)
I have a gluten free flour… Would this still work for the starter?
Hi Keli Sue-
Yep, gluten free flour will work. Best of luck!
Thank you -Bobbi (DaNelle’s Assistant)
What if I don’t have your type of mixer? I have a Kitchen Aide mixer; will that suffice? I think I already may have ask d this, but do you have a pizza dough recipe that uses a starter?
That should work fine!
When storing my starter in the fridge, do I keep a lid on it or a mesh? If a lid, do I tighten it? Also, since I want the tang, can I feed my starter just once a week? Some sites say to stir the liquid back into the mixture but you say to pour it off. I’m a newbie so thanks for all of the help I can get!
Keep a lid and tighten it. You can feed it as often as you like, but you still want it bubbly so it works as a yeast.
Thanks so much for these tips as well as for the following recipe on how to make soudough without the tang! My husband and 3 year-old don’t like the sourness but I’ve been determined to find a way to make it more mild. I have been keeping my yeast in the fridge not realizing it is contributing to the tang. I’m going to take it out now, power feed it, and try making your recipe using baking soda tomorrow. I’m really hoping for better results!
I’m going to start making my own sourdough starter again, but I wonder, do you have any tips on how to be less wasteful of the starter/ingredients? The past few times I have done this, I’ve stopped as I felt like I was going through a lot of flour, discarding it, etc. Maybe I should have been putting it in the fridge so I didn’t have to feed/discard as often? Any tips to be more frugal in this process?
It’s not too bad, you can use excess yeast to make pancakes, just google the recipe it’s really easy!
I keep mine in the fridge if I’m not actively baking, and only feed it every other day. And if I know I won’t be baking at all, I make my yeast go on a diet! I will feed it just 1-2 TBSP of flour with enough water to stir. Spelt flour is a lot slower to be digested by the yeast, so you could even feed it with that to keep the process slower than it would be with a wheat grain flour.
Clearest directions I’ve found for feeding a starter! Thank you! I do have a question. I have been feeding my new starter with equal parts of flour and water based on the weight of the starter (rather than the volume). I read somewhere that this results in starter that is at “100% Hydration” and it makes it easier to maintain a consistent texture. Do feel it’s necessary to be so exact? Thanks!
You don’t need to be exact, you really are looking for more of a “pancake batter” consistency when feeding it:)
My starter had water collect on the bottom! I’m wondering if maybe the fridge is too cold? What would cause this?
It just means your starter went dormant. Bring it out and liven it up by feeding it and it should revive:)
Wow, I have never heard of natural yeast until today. Something to consider. Thanks for the info.
I’m new to all of this and would like to use a starter. How do I start a starter?
If I used the natural yeast in a regular bread recipe would I need to add more flour or add less water accordingly since the yeast is a liquid compared to the powdered instant yeast? Just wondering if it would make my dough too sticky?
So I have a starter that I have been feeding, just like you said, but I only have about 1/4 a cup because I keep reducing it when I feed it. SO if i just add equal amounts of flour and water, I don’t have to reduce it, right? ANd that way I will be building it up to use in a loaf? THanks!
K, so for my starter I’m just using our leftover un-sprouted flour, but we also have left over un-sprouted wheat flour that I could use to feed.. I can switch them when I run out of regular white, right? Also, I’m seriously in love with your blog. Hardcore. Lol, thank you!
Yes, you can switch from white to wheat flour, it won’t affect the sourdough starter too much. Some people feel it’s bad to use white flour, but I say once in a while isn’t a big deal.
When using a reg bread recipe, how do I know how much natural yeast to use in place of non natural yeast?
I would say it’s about a 1/2 c. of natural/sourdough yeast to every tsp. of regular yeast in a recipe.
why would you not want the sour taste?????? I guess there are some times, can’t think of any, but will be glad to see the information any way!! 🙂
Just preference. Most people aren’t accustomed to sour bread.
If ever there was a dumb question… how much starter for a batch of bread? Say, four loaves.
Hi, great info…where do you purchas a mixer like yours…need info…you are a delightful happy lady to follow..thank you
Thank you! Here’s the mixer I use: https://amzn.to/2aqPw5Q
As for obtaining a sourdough starter, we went to a local bakery that makes sourdough bread and asked for a hunk of starter. They were more than happy to give us some, and the baker even gave us some instructions! We are now happy owners of a very healthy sourdough starter.
Even though I’m not eating the bread (I’m gluten free at the moment), I love feeding and using my starter. I keep it on the counter and feed it twice a a day. I love my little sourdough pet! I make bread for the family, and they LOVE the sourdough pancakes!